16 June 2009
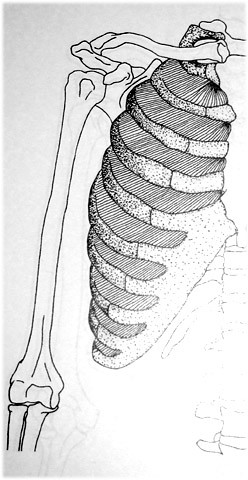
intercostales interni

The Intercostales interni are also eleven in number on each side.
Their attachments:
Their attachments:
- commence anteriorly at the sternum, in the interspaces between the cartilages of the true ribs;
- and at the anterior extremities of the cartilages of the false ribs,
- and extend backwards as far as the angles of the ribs, where each is replaced by an aponeurotic layer named the posterior intercostal membrane, which is continuous with the superior costotransverse ligament.
Each muscle arises from the floor of the costal groove and the corresponding costal cartilage, and is inserted into the upper border of the rib below.
Their fibers axe also directed obliquely, but at right angles to those of the External intercostal muscles.
Their fibers axe also directed obliquely, but at right angles to those of the External intercostal muscles.
06 February 2009


14 December 2008
final assignment, final day for LD I (fall 2008)
 the dates and times of our final meeting(s) are listed to the left on the sidebar.
what you need to do before your final meeting time:
- create a final blog post which will serve as your class portfolio. the idea is to present to me (and to any other interested art professional) what you learned in Life Drawing I--how successfully you were able to put Life Drawing I concepts into your drawings.
 this post should include: 1) 5-6 of your best drawings since your october class summary (self-portrait, at least one skull, and 1-2 other long poses and 2-3 gesture drawings); 2) one or two paragraphs summarizing your experience in Life Drawing I including what two-three most substantial things you learned or at which you improved, citing examples; 3) a description of your experience building muscles on the maniken (photos optional).

- you will have 5 minutes to present this post during your final exam time.

- finish building muscles on your maniken--the last set of muscles were the arm/forearm/hand.
- bring your finished maniken to the final meeting time. i will grade this from the real maniken, but if you'd like to add photos to your blog, you may.
 draw a self-portrait (18" x 24") using what you learned about the structure of the skull and facial features. draw yourself from a front 3/4 view, using a mirror. construct the drawing with line and line value only, not with shading. your focus should be on planar analysis, anatomical landmarks, cross-contours, and line quality--as well as acute observation of your own particular skull and face.


- bring your self-portrait to the final meeting time. we will hang these up in order to look at everyone's final drawing of the semester (even though these will be in your blog summary, too).
15 November 2008

07 November 2008
life drawing one update
hello everyone,
i want to update you on life drawing one after being gone all week. the stomach flu hit my house with a vengeance! first me, then my son. nasty stuff. we’re both back at school today—thank goodness.
as far as class goes, these are the things I’d like you to be caught up on by tuesday of next week (nov. 11):
your maniken, including the latest muscles of the leg (these are listed above):
flexor digitorum longus tibialis posterior flexor hallucis longus popliteus soleus gastrocnemius
extensor digitorum longus (long extensor of the toes)
extensor hallucis longus (long extensor of the big toe)
peroneus tertius (consider this part of the extensor digitorum longus, as its fifth tendon.)
peroneal brevis (left)
peroneal longus (right)
2. a summary of the class up to this point. do this in a format that makes sense to you (one long blog post, three or four shorter ones, a video you link to your blog, etc.) you have creative license as long as you address the following topics and do it well. obviously, this is way beyond a “midterm” portfolio. however, I think it will still be useful for you to look back at the semester as you answer the following questions and complete/revise/add-on to a blog post that examines what you’ve learned up to this point in the semester and what you’d still like to accomplish in the six weeks we have left (-1/2 week for thanksgiving, and including 1 week for the final exam day).
long drawings
photograph and post your three best drawings at this point in the semester.f or each drawing, describe what makes it strong. what did you see in that drawing that you did not see before? what did you get on the paper makes the drawing successful in terms of our class? i would rather you talk in specifics here rather than generalities. you may not have a whole “good” or “strong” drawing in terms of everything being right—proportion, gesture, anatomy, composition, etc. you may have one drawing that is best in anatomical description, one that’s best in line variation, etc. with these three drawings and your descriptions of them, i want you to show me what you have learned. what have you accomplished? how well do you know and use the language of drawing (the literal written language and the more metaphorical visual language)? prove to me (or another professor, gallery owner, grad school committee, design firm, etc.) what you have learned and how this learning/problem-solving you’ve done makes you a better artist, designer, employee, seer, etc.
maniken
post four images of your maniken. these should have plenty of detail, in focus (!), have a clean, non-distracting background (use photoshop if nothing else), and show me (and/or any other interested viewer) your clay building skills and understanding of the muscles we’ve built so far.
with each photo, describe what is strongest about your maniken from that point of view and what you would revise to make more accurate, more clear, or more consistent in terms of anatomy, muscle grouping, clay craft, etc.
use anatomical language as you describe the manikens.
blog
reflect on your use of blogging to help you record and reflect on your experiences in life drawing one by addressing the following questions (feel free to use screen shots as illustrations, or provide links to earlier posts and/or comments):
a tentative schedule for the rest of the semester:
nov 11 – 13: leg, foot
nov 18 – 20: shoulder girdle
nov 25: arm/forearm
dec 2 – 4: hand, skull
dec 9 – 11: facial features, self-portrait (final portfolio [similar to what you’re doing above] due)
dec 17 & 18: LD I finals (homework self-portrait due, added to final portfolio)
i do not like being out of class for so many days. we will have to transition quickly back into life drawing mode next week. making sure your maniken is up-to-date and your class summary is done and done well—both by tuesday, nov. 11—will get you back in the mode, I’m sure.
have a good weekend. work hard. stay away from the germs!
Amy


i want to update you on life drawing one after being gone all week. the stomach flu hit my house with a vengeance! first me, then my son. nasty stuff. we’re both back at school today—thank goodness.
as far as class goes, these are the things I’d like you to be caught up on by tuesday of next week (nov. 11):
your maniken, including the latest muscles of the leg (these are listed above):
flexor digitorum longus tibialis posterior flexor hallucis longus popliteus soleus gastrocnemius
extensor digitorum longus (long extensor of the toes)
extensor hallucis longus (long extensor of the big toe)
peroneus tertius (consider this part of the extensor digitorum longus, as its fifth tendon.)
peroneal brevis (left)
peroneal longus (right)
2. a summary of the class up to this point. do this in a format that makes sense to you (one long blog post, three or four shorter ones, a video you link to your blog, etc.) you have creative license as long as you address the following topics and do it well. obviously, this is way beyond a “midterm” portfolio. however, I think it will still be useful for you to look back at the semester as you answer the following questions and complete/revise/add-on to a blog post that examines what you’ve learned up to this point in the semester and what you’d still like to accomplish in the six weeks we have left (-1/2 week for thanksgiving, and including 1 week for the final exam day).
gesture drawings
first, select three gesture drawings characteristic of your work from early on in the semester.
second, go through your drawings and select three of your best gesture drawings (one 30-second pose, one 60-second pose, one 1+ minute-pose [anything from 60 seconds – 5 minutes]).
photograph these six gesture drawings and post on your blog, in order from earliest to latest. it will make the writing easier if you title these drawings, even simply (such as gesture #1, gesture #2, etc.).in your blog post, reflect on what you’ve accomplished in your gesture drawings. point to specific areas/passages in the drawings as your write (I’m attaching two ways you might want to do this— images i created using jing [available as a free download]. one includes the comments on the drawing itself. the other uses numbers that would correspond with comments written in the blog post.) address how well you’ve done the following, as well as point to specifics on what has changed in your drawings from the beginning of the semester up to now. (you do not have to address each of these in every drawing, but you should touch on each one at least once throughout the entire discussion of your gesture drawings):
- included the whole figure on the page
- placed the figure in a picture plane that’s proportionate to the overall piece of drawing paper (rather than drawing random sketches anywhere on the page, in any proportion)
- used anatomical landmarks (rib cage, pelvis, spinal column, structural aspects of femur and tibia, etc.)
- focused on long axis lines rather than outlines
- incorporated line variation (value [light, medium, dark], character [sharp, soft, long short, fast, slow, etc])
- captured the feeling of the pose (can you tell immediately what pose the model is in by looking at the drawing? can the viewer relate with their own kinesthetic sense to the pose?)
- exaggerated angles and pose (are there diagonals in the pose? strong lines of emphasis and movement?)
- related a sense of a living figure on the page (this is really a composite of all the elements above. here, you can discuss the drawing as a whole).


long drawings
photograph and post your three best drawings at this point in the semester.f or each drawing, describe what makes it strong. what did you see in that drawing that you did not see before? what did you get on the paper makes the drawing successful in terms of our class? i would rather you talk in specifics here rather than generalities. you may not have a whole “good” or “strong” drawing in terms of everything being right—proportion, gesture, anatomy, composition, etc. you may have one drawing that is best in anatomical description, one that’s best in line variation, etc. with these three drawings and your descriptions of them, i want you to show me what you have learned. what have you accomplished? how well do you know and use the language of drawing (the literal written language and the more metaphorical visual language)? prove to me (or another professor, gallery owner, grad school committee, design firm, etc.) what you have learned and how this learning/problem-solving you’ve done makes you a better artist, designer, employee, seer, etc.
maniken
post four images of your maniken. these should have plenty of detail, in focus (!), have a clean, non-distracting background (use photoshop if nothing else), and show me (and/or any other interested viewer) your clay building skills and understanding of the muscles we’ve built so far.
with each photo, describe what is strongest about your maniken from that point of view and what you would revise to make more accurate, more clear, or more consistent in terms of anatomy, muscle grouping, clay craft, etc.
use anatomical language as you describe the manikens.
- 3/4 anterior view of upper body
- 3/4 posterior view of upper body
- 3/4 anterior view of lower torso and legs
- 3/4 posterior view of lower torso and legs
blog
reflect on your use of blogging to help you record and reflect on your experiences in life drawing one by addressing the following questions (feel free to use screen shots as illustrations, or provide links to earlier posts and/or comments):
- what is the most interesting/attention-holding blog post you came across by another student this semester? what made it so?
- what do you enjoy about blogging?
- what do find frustrating about using the blog?
- what would you like to post about that you haven’t?
- how many comments have you left for your blog group members?
- when blog group members have commented on your posts, have you replied back?
- if you could give one blog assignment to the class, what would it be?
- how would you rate your blog at this point in the semester in terms of
- image quality?
- response to other students (quality and quantity)?
- blogging about miscellaneous or art-related content other than just assigned blog posts?
- helpfulness to other members of your blog group and/or other students in the class?
- representing yourself as a professional artist to a public audience? looking at your blog, how would others describe you and your work?
a tentative schedule for the rest of the semester:
nov 11 – 13: leg, foot
nov 18 – 20: shoulder girdle
nov 25: arm/forearm
dec 2 – 4: hand, skull
dec 9 – 11: facial features, self-portrait (final portfolio [similar to what you’re doing above] due)
dec 17 & 18: LD I finals (homework self-portrait due, added to final portfolio)
i do not like being out of class for so many days. we will have to transition quickly back into life drawing mode next week. making sure your maniken is up-to-date and your class summary is done and done well—both by tuesday, nov. 11—will get you back in the mode, I’m sure.
have a good weekend. work hard. stay away from the germs!
Amy


30 October 2008
assignment for tuesday, november 4
build the following leg muscles
(look them up in the index of volume 4, pelvic skeleton)
posterior leg:
deep muscles of the posterior leg:
 flexor digitorum longus
tibialis posterior
flexor hallucis longus
popliteus
superficial muscles of the posterior leg:
soleus
gastrocnemius

 anterior leg = extensors (dorsiflexors)
tibialis anterior - this muscle begins high on the lateral tibia. its tendon crosses over to the medial ankle and foot. (this cross-over tendon creates, as robert beverly hale writes, a form the size of the nose--by paying attention to it while building and drawing, you can create a nice transition from leg to foot).
extensor digitorum longus (long extensor of the toes)
extensor hallucis longus (long extensor of the big toe)
peroneus tertius (consider this part of the extensor digitorum longus, as its fifth tendon.)

 lateral leg
peroneal brevis (left)
peroneal longus (right)
16 October 2008
assignment for thursday, october 23

- build the following muscles on your maniken
- describe your process building them
- include your group's summary
class on thursday, october 16


quadriceps
vastus intermedius
(vol. 4, pp. 94 - 95)
vastus medialis
(vol. 4, pp. 96 - 97)
vastus lateralis
(vol. 4, pp. 98 - 99)
rectus femoris
(vol. 4, pp. 100 - 101)
vastus intermedius
(vol. 4, pp. 94 - 95)
vastus medialis
(vol. 4, pp. 96 - 97)
vastus lateralis
(vol. 4, pp. 98 - 99)
rectus femoris
(vol. 4, pp. 100 - 101)


 adductors
pectineus
(vol. 4, pp. 102 - 103)
adductor longus
(vol. 4, pp. 104 - 105)
adductor brevis
(vol. 4, pp. 106 - 107)
adductor magnus
(vol. 4, pp. 108 - 109)
gracilis
(vol. 4, pp. 110 - 111)


hamstrings
semimembranosus (vol. 4, pp. 112 - 113)
semitendinosus (vol. 4, pp. 114 - 115)
biceps femoris (vol. 4, pp. 116 - 117)

sartorius
(vol. 4, pp. 122 - 123)

"my favorite muscle"--see, i'm not the only one who says this--click on the link for some good information on the sartorius and a very clear image of one on a bodybuilder, from http://anatomynotes.blogspot.com
assignment for thursday, october 16

 tuesday (october 14) in class, we spent some time in blog groups where you looked at each others' manikens and checked where each of them were in terms of accuracy of anatomy and quality of the clay building. the muscles that should have been finished at that point were
- spinal erectors with lumbodorsal fascia
- quadratus lumborum
- external obliques
- rectus abs
- tensor fasciae latae with IT band
- gluteus minimus
- gluteus medius
- gluteus maximus, iliac and axial heads
for your blog:
- post at least three images of your maniken with the glutes finished (front, side, back [or 3/4 views])
- describe your process of building these muscles
- include your group's summary from class on tuesday, october 14, that describes how your group worked together to make your manikens more accurate and more carefully built (in terms of aesthetic quality of the clay--marks or no marks, visible plane changes, clarity of forms, etc.)
- feel free to add additional comments to the group summary if you'd like (optional)
assignment for tuesday, october 14
finish building glutes
 gluteus minimus (vol. 4, pp. 42-43)
gluteus medius (vol. 4, pp. 44-45)
tensor fasciae latae (vol. 4, pp. 118-119)
gluteus maximus, iliac head (vol. 4, pp. 120-121)
you do not have to build the IT band again; you've already built it with the tensor
gluteus maximus, axial head (vol. 5, pp. 64-65)
 gluteus minimus (vol. 4, pp. 42-43)
gluteus medius (vol. 4, pp. 44-45)
tensor fasciae latae (vol. 4, pp. 118-119)
gluteus maximus, iliac head (vol. 4, pp. 120-121)
you do not have to build the IT band again; you've already built it with the tensor
gluteus maximus, axial head (vol. 5, pp. 64-65)
Subscribe to:
Posts (Atom)